Road Studs Colours and What They Mean?
Mar 04, 2025
In the complex system of road transportation, safety is always the top priority. Every year, there are countless traffic accidents caused by unclear road conditions, which bring great losses to people's lives and properties. The importance of road marking as a key element in ensuring traffic safety cannot be overstated. Among them, the color of road studs contains rich and critical information, which has a crucial impact on drivers' driving decisions. Next, let us delve into the mystery of the road stud color and its related knowledge.
Before installing road studs, the first thing to do is to level the installation area. Ensure that the ground leveling of the installation area is to ensure the road stud installation quality and stability of the foundation. At the same time, to protect construction safety, construction personnel need to set up plastic cones around the installation area in advance. These plastic cones can clearly warn passing vehicles and pedestrians. Here is under construction; please pay attention to avoid it, effectively avoiding accidents during construction.
Handling of uneven road surface
If the road surface in the installation area is uneven, such as with potholes, bumps, etc., the construction crew needs to repair the road surface first. It can be used to fill potholes, shovel bumps, etc., so that the road surface reaches a level state. Only the road surface is leveled; the road stud can be installed with the road surface close fit, solidly fixed on the ground, better playing its due role.
The installation of studs in the area must be kept dry and clean, with no sand, water, oil, sewage, or other impurities. These impurities will affect the glue and the ground as well as the bonding effect between the stud, resulting in the installation of the stud not being solid and easy to loosen or fall off. Therefore, ensuring the cleanliness of the installation area is an essential part of the installation process.
Cleaning methods
To achieve the cleaning requirements, the construction personnel will usually use a steel brush to carefully scrub the ground in the installation area. The steel brush effectively removes dirt, impurities, and loose particles from the floor, making the surface rougher and increasing the adhesion of the adhesive to the floor. After brushing, then through the compressor to the ground blowing, the ground on the residual dust and debris is completely clean to ensure that the ground is completely dry for the subsequent application of glue and studs ready for installation.
The glue used for cat's eye road studs generally consists of two components: A glue and B glue. These two types of glue need to be mixed according to a specific ratio to achieve the best bonding effect. The composition and mixing ratio of Glue A and Glue B may vary between different brands and models of glue, so the constructor must strictly follow the product instructions when mixing the glue.
Mixing method
To ensure that the glue is evenly mixed and to improve the quality of the bond, the contractor usually uses a machine to mix the glue. A common method is to use an electric hammer in combination with mixing teeth. After pouring glue A and glue B into the container according to the specified proportion, the hammer is activated to drive the stirring teeth to rotate rapidly and mix the glue thoroughly. During the mixing process, the construction personnel need to closely observe the mixing state of the glue to ensure that the two kinds of glue are completely fused, the color is uniform, and there is no obvious delamination or lumping phenomenon.
After the glue mixing is completed, the construction personnel need to glue it evenly on the ground. The thickness of the glue is generally controlled at about 2 mm. If the thickness is too thin, it may lead to poor bonding of the studs; if the thickness is too thick, it will lead to a waste of glue and may affect the installation effect of the studs. In the application of glue, the construction personnel should use specialized tools, such as a scraper or brush, to ensure that the glue is evenly covered in the installation of studs to provide a good bonding base for the studs.
Stud placement and compaction
After applying the glue, the construction crew should quickly place the roadway stud in the intended location. Placement to ensure that the location of the stud is accurate and the surrounding studs maintain a neat arrangement. After placing the road studs, the construction personnel need to use their fingers to tighten the studs so that the studs and the glue are in full contact with the possible air bubbles to enhance the bonding effect. Afterwards, to further improve the bonding strength of the stud, you can drive the vehicle slowly to run over the ground around the stud, through the weight of the vehicle on the stud for the second compaction, so that the stud is more firmly fixed on the ground.
After the road stud is pasted, you need to give enough time for the glue to fully cure. In general, the road studs need to be left to stand for about 6 hours to ensure that the glue reaches the optimal bonding strength. During these 6 hours, the construction personnel should set up obvious warning signs around the installation area to prevent vehicles and pedestrians from accidentally touching the stud, affecting the curing effect of the glue and the quality of the installation of the stud.
Inspection and repair
After the curing of the glue, the construction personnel need to install the road studs to carry out a comprehensive inspection. The inspection includes whether the stud is correctly positioned, whether it is firmly fixed on the ground, and whether there is any loose or damaged condition. If it is found that the stud has been removed or damaged, the construction workers need to re-paste it in time. Only by ensuring that every road stud can function properly can the integrity and effectiveness of the road stud system be ensured, providing a reliable guarantee for road traffic safety.
If you are also looking for an energy-saving and efficient, environmentally safe road safety facilities, please contact Nokin, we will customize your exclusive road safety solutions, and work together to guard traffic safety.
How Do Cat’s Eyes road studs Work?
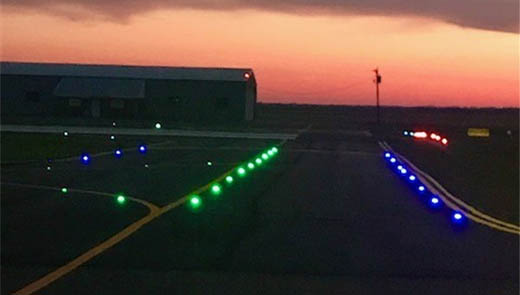
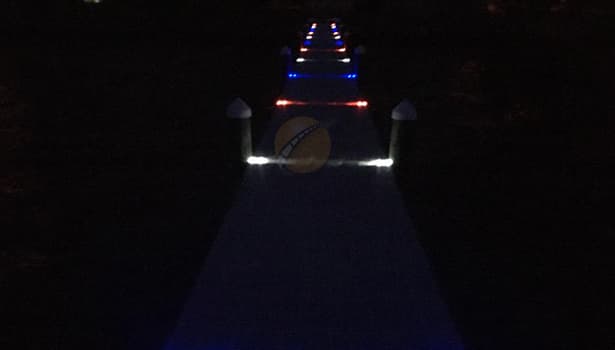
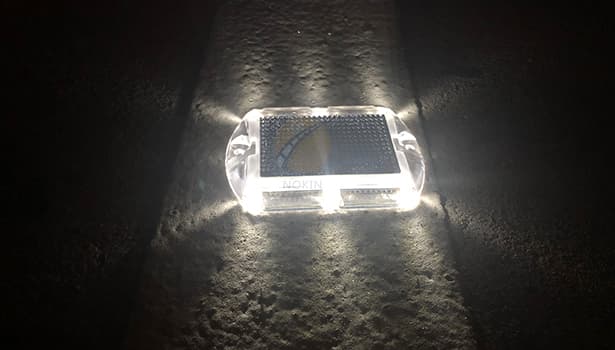
1. Active road studs working principle
Active light-emitting road studs are usually built in with power supplies and light-emitting components, such as LED lights. Its power source is diverse, with common solar-powered and battery-powered two ways. Take the solar-powered active light-emitting stud as an example; the top of the stud is equipped with a small solar panel. During the day, the solar panel absorbs the sun's energy and converts it into electricity stored in an internal battery. When night falls or the ambient light weakens, the stud's built-in light sensor will sense the change in light, triggering the circuit to turn on. At this point, the electricity stored in the battery drives LED lights. The light is dispersed evenly and efficiently around the roadway by a specific optical design, providing drivers with a clear indication of the roadway's contours. On the highway at night, the bright light of active light-emitting dowels can be seen by drivers at a longer distance, helping drivers accurately determine the lane's location and the road's direction.2. Reflective road studs principle
Reflective road studs do not emit light but rely on reflecting the lights of passing vehicles to realize the warning effect. Its internal structure mainly contains high refractive index reflective materials, such as glass beads or reflective lattice sheets. When the light from the headlights of a car hits the reflective stud, the light enters the glass beads or the reflective lattice. Due to the high refractive index of these materials, the light is refracted and reflected many times inside. According to the principle of optics, the light will eventually be reflected to the light source, the driver's eyes, in a direction nearly parallel to the incident light after a carefully designed angle. In the darker light of the country road, the vehicle headlights hit the reflective road studs; the studs will reflect bright light so that the driver can detect the road boundaries and direction in time to avoid deviation from the road and avoid danger on the road. This reflective mechanism makes reflective road studs in the night or low-visibility environment, without additional energy supply, continue to play a warning role.The Impact of Studs Colour on Motorway Safety
1. Reliable guidance under complex road conditions
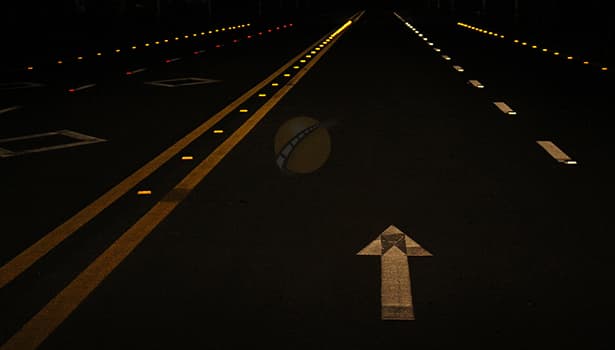
When driving at night, the light conditions are poor, and the driver's vision is greatly restricted. And encountered heavy rain, fog, and other bad weather; visibility is sharply reduced; the driving environment has become very dangerous. At this time, the color of the road stud has become an important driver to rely on. Different colors of road studs can help drivers accurately identify road contours, clearly determine lane boundaries, and accurately determine the location of special areas. For example, on the foggy highway, white road studs can clearly outline the distribution of lanes so that the driver with blurred vision can still keep driving in the correct lane, enhancing the confidence of driving and effectively reducing the risk of accidents.2. Efficient and intuitive information transfer
A significant advantage of the road stud color is that it can be the most intuitive, simple way for the driver to convey key road information without relying on complex text signs or verbal instructions. White road studs delineate lanes so that drivers know exactly where they are traveling; red studs warn of non-crossable boundaries, always reminding drivers to follow traffic rules; amber studs define specific segregation zones to ensure the orderly movement of vehicles; and green studs show drivers where they can leave the main lane. This efficient information transfer method enables drivers to obtain important information in an instant and make correct driving decisions quickly, which greatly improves the efficiency of road information transfer and guarantees the smooth operation of road traffic.3. Visual security in a low-light environment
Road studs have excellent reflective properties; this feature plays a vital role in the low-light environment. In some traditional lighting facilities, more sparse long sections of highway, the reflective effect of the road stud is particularly obvious. When the headlights of the vehicle shine on the road studs, the studs will reflect a bright light, attracting the attention of the driver. This not only allows the driver to notice the direction and condition of the road in time but also effectively improves the driver's alertness to potential road hazards. For example, in remote areas of the highway, the reflection of the red road studs can allow drivers to note in advance that the area cannot be crossed to avoid the danger caused by negligence, adding a solid line of defense for road traffic safety.The most common coloured road studs
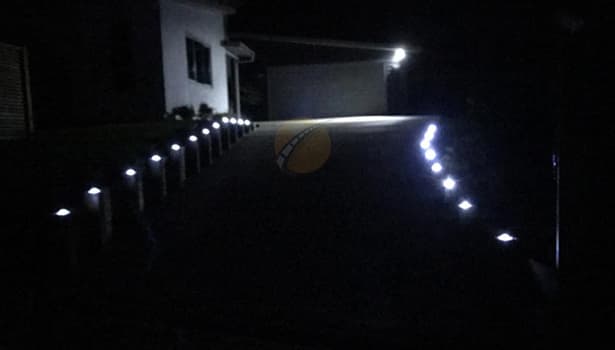
1. White road studs
White road studs are the most common and easiest to recognize type of road stud. On the highway, it bears the important responsibility of marking the lanes and delineating the driving area of different vehicles to ensure that vehicles can travel in an orderly manner. Meanwhile, on one-way streets, white road studs are also used to mark the centerline of dotted lines, providing drivers with a reference for driving direction. In the normal driving section of the highway, white road studs are neatly arranged between the lanes, like a white ribbon, clearly separating the lanes. Drivers only need to follow the guide of the white pins; they can easily keep driving in their lanes to avoid collisions caused by lane confusion and to protect the traffic order of the highway.2. Red road studs
Red, in the field of transportation, usually represents prohibition and warning. This is exactly what red pins do on the road. They are used to mark lines that vehicles must not cross. In countries such as the United Kingdom, where the rule of driving on the left is in force, red pins are usually placed on the left-hand edge of the carriageway. On the highway, red pins are like a serious traffic guard, always warning drivers not to cross the left side of the border. Once the driver ignores the warning of red pins and crosses the left side of the border at will, he or she is very likely to break into the opposite lane and cause a serious head-on collision or enter the emergency area, affecting the development of emergency rescue work. Therefore, the red stud for the protection of driving safety, to prevent vehicles from breaking into dangerous areas, plays a crucial role.3. Amber road studs
Amber pins are mainly used on the road to mark the right side of the road and cannot cross the area. On two-lane roads or highways, amber pins are usually placed in the center median. It acts as an invisible barrier, clearly defining the extent of the center median and preventing vehicles from crossing it illegally. On highways, vehicles travel at high speeds, and without the clear marking of amber pins, drivers may inadvertently cross the center median by mistake, which can lead to serious traffic accidents. The existence of amber pins allows drivers to identify the location of the central dividing zone from a distance and make driving decisions in advance, effectively reducing the risk of head-on collision due to illegal crossing of the central dividing zone and safeguarding highway driving safety.4. Green Road stud
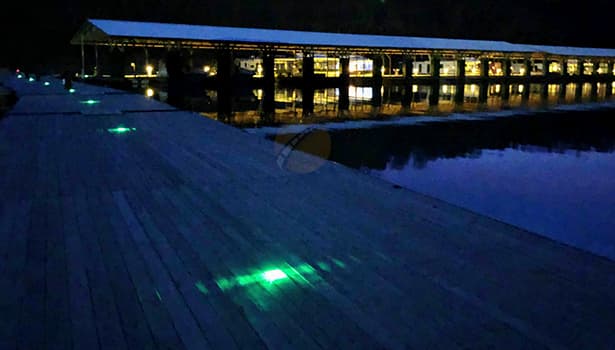
Green road studs have a unique indication role on the road, which is mainly used to indicate the location where vehicles can leave the main lane. This includes freeway ramps, when the driver needs to leave the freeway to other roads, the green road studs will be in advance for its direction; and bus stops, to facilitate the accurate stopping of buses and passengers to get on and off the bus safely; as well as parking strips, to provide temporary parking areas for vehicles. When vehicles are ready to leave the freeway and enter the on-ramp, the green pins will be arranged along the entrance of the ramp and the direction of travel, reminding drivers in advance to be ready to change lanes and guiding them to safely leave the main lane. Similarly, in the vicinity of bus stops and parking strips, green pins mark the location of these special areas, facilitating the passage of vehicles and pedestrians and improving the efficiency and safety of road use.5. Green/Yellow road studs
The presence of green/yellow studs indicates a temporary change in the road layout. This is usually due to road construction. During road construction, green/yellow studs are used to highlight newly created lanes or temporarily adjusted areas of the road to ensure the smooth running of the work and the safe passage of vehicles. On a section of highway that is being widened, green/yellow studs are placed along the edges of the newly created lanes. These pins alert drivers to temporary changes in the roadway and direct traffic to follow the new lane layout. Drivers can slow down and adjust their driving routes in advance when they see the green/yellow pins, avoiding traffic congestion or accidents caused by ignorance of the changes in road conditions and ensuring traffic order and safety during road construction.How to Install the Road Studs
1. Meticulous road surface preparation
Site leveling and warning settingsBefore installing road studs, the first thing to do is to level the installation area. Ensure that the ground leveling of the installation area is to ensure the road stud installation quality and stability of the foundation. At the same time, to protect construction safety, construction personnel need to set up plastic cones around the installation area in advance. These plastic cones can clearly warn passing vehicles and pedestrians. Here is under construction; please pay attention to avoid it, effectively avoiding accidents during construction.
Handling of uneven road surface
If the road surface in the installation area is uneven, such as with potholes, bumps, etc., the construction crew needs to repair the road surface first. It can be used to fill potholes, shovel bumps, etc., so that the road surface reaches a level state. Only the road surface is leveled; the road stud can be installed with the road surface close fit, solidly fixed on the ground, better playing its due role.
2. Strict installation area cleaning
Cleaning requirementsThe installation of studs in the area must be kept dry and clean, with no sand, water, oil, sewage, or other impurities. These impurities will affect the glue and the ground as well as the bonding effect between the stud, resulting in the installation of the stud not being solid and easy to loosen or fall off. Therefore, ensuring the cleanliness of the installation area is an essential part of the installation process.
Cleaning methods
To achieve the cleaning requirements, the construction personnel will usually use a steel brush to carefully scrub the ground in the installation area. The steel brush effectively removes dirt, impurities, and loose particles from the floor, making the surface rougher and increasing the adhesion of the adhesive to the floor. After brushing, then through the compressor to the ground blowing, the ground on the residual dust and debris is completely clean to ensure that the ground is completely dry for the subsequent application of glue and studs ready for installation.
3. Accurate glue mixing
Glue compositionThe glue used for cat's eye road studs generally consists of two components: A glue and B glue. These two types of glue need to be mixed according to a specific ratio to achieve the best bonding effect. The composition and mixing ratio of Glue A and Glue B may vary between different brands and models of glue, so the constructor must strictly follow the product instructions when mixing the glue.
Mixing method
To ensure that the glue is evenly mixed and to improve the quality of the bond, the contractor usually uses a machine to mix the glue. A common method is to use an electric hammer in combination with mixing teeth. After pouring glue A and glue B into the container according to the specified proportion, the hammer is activated to drive the stirring teeth to rotate rapidly and mix the glue thoroughly. During the mixing process, the construction personnel need to closely observe the mixing state of the glue to ensure that the two kinds of glue are completely fused, the color is uniform, and there is no obvious delamination or lumping phenomenon.
4. Standardize the operation of pasting studs
Glue operationAfter the glue mixing is completed, the construction personnel need to glue it evenly on the ground. The thickness of the glue is generally controlled at about 2 mm. If the thickness is too thin, it may lead to poor bonding of the studs; if the thickness is too thick, it will lead to a waste of glue and may affect the installation effect of the studs. In the application of glue, the construction personnel should use specialized tools, such as a scraper or brush, to ensure that the glue is evenly covered in the installation of studs to provide a good bonding base for the studs.
Stud placement and compaction
After applying the glue, the construction crew should quickly place the roadway stud in the intended location. Placement to ensure that the location of the stud is accurate and the surrounding studs maintain a neat arrangement. After placing the road studs, the construction personnel need to use their fingers to tighten the studs so that the studs and the glue are in full contact with the possible air bubbles to enhance the bonding effect. Afterwards, to further improve the bonding strength of the stud, you can drive the vehicle slowly to run over the ground around the stud, through the weight of the vehicle on the stud for the second compaction, so that the stud is more firmly fixed on the ground.
5. Comprehensive post-installation treatment
Curing timeAfter the road stud is pasted, you need to give enough time for the glue to fully cure. In general, the road studs need to be left to stand for about 6 hours to ensure that the glue reaches the optimal bonding strength. During these 6 hours, the construction personnel should set up obvious warning signs around the installation area to prevent vehicles and pedestrians from accidentally touching the stud, affecting the curing effect of the glue and the quality of the installation of the stud.
Inspection and repair
After the curing of the glue, the construction personnel need to install the road studs to carry out a comprehensive inspection. The inspection includes whether the stud is correctly positioned, whether it is firmly fixed on the ground, and whether there is any loose or damaged condition. If it is found that the stud has been removed or damaged, the construction workers need to re-paste it in time. Only by ensuring that every road stud can function properly can the integrity and effectiveness of the road stud system be ensured, providing a reliable guarantee for road traffic safety.
Conclusion
Road studs colorful, white used to divide lanes, red warning prohibit crossing, amber studs can be used to define the area, green studs for drivers and road users to guide the exit, etc., constituting an efficient information system to ensure the safety and smoothness of the road. The effectiveness of road studs is closely related to standardized installation, routine maintenance and timely repair.If you are also looking for an energy-saving and efficient, environmentally safe road safety facilities, please contact Nokin, we will customize your exclusive road safety solutions, and work together to guard traffic safety.